

©Pat Ashforth & Steve Plummer 2021
©Pat Ashforth & Steve Plummer 2021

SQUARES-
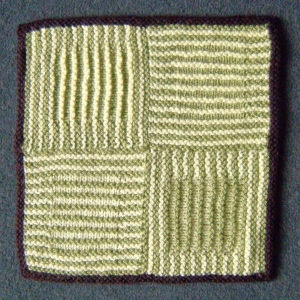
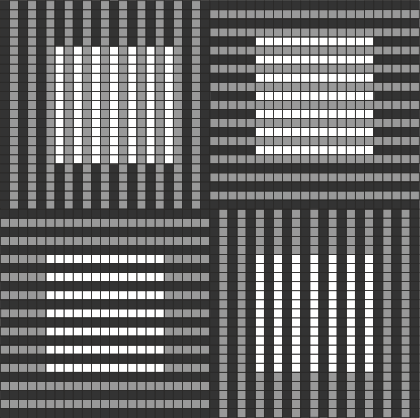
This design uses the same two colours as Directional Shadows so they may look similar at first glance. Looking from an angle reveals a smaller square inside each of the squares. Some of these squares are yellow and some are green.
It is less obvious that these squares appear to have a third shade for the area surrounding the smaller squares. This colour is the same on all four larger squares but may not look the same when seen from different angles.
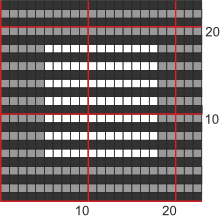
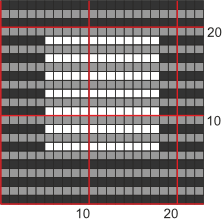
To knit a single square (Square 1, using grid A))
Using Dark, cast on 23 stitches. Count this as the first row of the first ridge.
Ridge 1 -
Ridge 2 (Light) : Knit both rows.
Ridge 3 (Dark) : Knit both rows.
Ridges 4 & 5 : Repeat Ridges 2 and 3.
Ridge 6 (Light) : Knit the first row. On the second row knit the coloured stitches and purl the white stitches.
The chart shows k5, p13, k5
All odd numbered ridges have both rows knit.
Ridges 8, 10, 12, 14, 16, 18 (Light) : As Ridge 6.
Ridges 20 & 22 (Light) : As Ridge 2.
The square using grid B is very similar. Follow the chart:
Start with Dark
Change colour for every ridge
Knit all right side rows
On the wrong side purl all white stitches and knit all coloured-
To knit a group of 4 squares
Make Square 1 and keep the stitches on a stitch holder.
Square 2
Turn Square 1 sideways and, using Dark, pick up one stitch from the end of each ridge (23 stitches).
Work as for Square 1A. Cast off.
Square 3
Turn work sideways and, using Dark, pick up one stitch from the end of each ridge (23 stitches).
Work Square 1B. Cast off.
Square 4
Work as for Square 3 joining the new square to the stitches on the stitch-
Join by putting the stitches from the holder onto another needle and knitting the last stitch on the new square with the next stitch of the stitches from the holder.
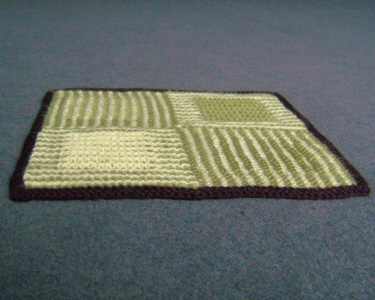
The photo shows the arrangement of four squares with a two-
A
B
Squares A and B do not look exactly alike because it is not possible to get all the smaller squares centred and get them to be different colours, unless the larger square for one begins and ends with the opposite colour from the other. The squares in the photos all begin and end with the darker colour. There are many such considerations to be taken into account when you are planning a design incorporating several pieces.
An alternative to working in pieces would be to make one large piece and work several squares into it as you go.
Many of the ideas in Woolly Thoughts (book) will help you to create designs with squares.
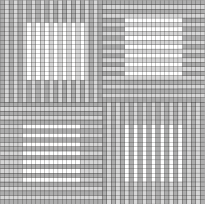
4 3
1 2
| The Gift of Life |
| Merry Christmas |
| Drawing Programs |
| Using Inkscape |
| Modelling Programs |
| George Maffett's Introduction |
| Art tutorials |
| Geometric tutorials |
| Video tutorials |
| Maple Leaf |
| Tiger |
| Maple Leaf : Part 1 |
| Maple Leaf : Part 2 |
| Maple Leaf : Part 3 |
| Tiger : Part 1 |
| Tiger : Part 2 |
| Tiger : Part 3 |
| Tiger : Part 4 |
| Tiger : Part 5 |
| Tiger : Part 6 |
| Tiger : Part 7 |