

©Pat Ashforth & Steve Plummer 2021
©Pat Ashforth & Steve Plummer 2021

EYE OF THE TIGER : PART 1
Illusion Knit Tutorial Part 1: Getting started
Please note that UK English spellings are used throughout. American spellings may differ.
This tutorial leads towards the creation of an illusion knit design based upon an image of a tiger’s head.
The whole project will be 150 ridges wide and 150 stitches high but a smaller project, showing just the tiger’s face, could also be created from the same chart. This smaller project will be 80 ridges wide by 80 stitches high.
The completed piece of work is being designed with the intention that it is to be viewed from the side so it could form part of a wall hanging, a panel on a jacket or the front of a bag.
You will need a drawing program that allows you to create layers, draw a grid and import an image. Using layers is very important. I can turn off the visibility on a layer so I can see my design without the original image, I can look at the effect one of my colours is having by turning off the visibility on the other colour, etc.
You can use any program that allows you to do all of these things. The commands you use may vary from those used in Inkscape.
Inkscape note: Inkscape is a free drawing program and is easy to download and reasonably easy to use although I have noticed a tendency for the program to close at inconvenient times. Save your work at regular intervals and this is no more than a minor inconvenience. (See Using Inkscape page)
I am going to use six layers to help me draw out the design.
Layer 1 -
Layer 2 -
Layer 3 -
Layer 4 -
Layer 5 -
Layer 6 -
Within reasonable limitations equal numbers of cast on stitches and ridges (2 rows) in illusion knitting produce a square. This means that if I use my squared grid to show ridges of knitting instead of rows of knitting there will be no, or very little, distortion of the image I use for my design when it is viewed as a completed piece. My completed piece of illusion knitting will come out to the same proportions as the image I used at the start.
* * * * * * *
My original image was the tiger you can see at the top of this page.
I converted it to grayscale to make it easier to see areas of dark, light and intermediate shadow.
I rotated it through 90 degrees because the piece of illusion knitting is going to be viewed from the side and because I like my charts to run from bottom to top.
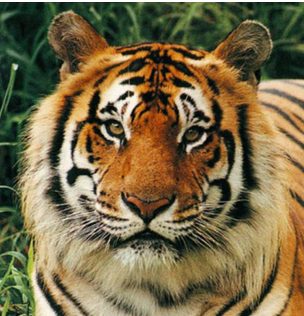
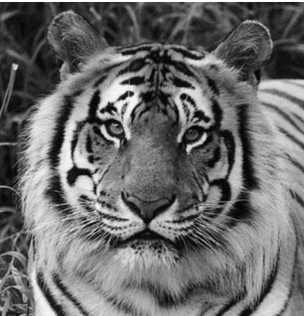
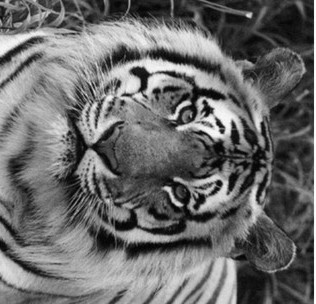
I am using the rotated image in the tutorial. If you are going to follow the tutorial, save the image on to your computer so that you can then import it into your drawing program.
To save the image to your computer
Right click on the rotated image of the tiger
Click on “Save image as”
Choose a place to save it on your computer and give it a name
| The Gift of Life |
| Merry Christmas |
| Drawing Programs |
| Using Inkscape |
| Modelling Programs |
| George Maffett's Introduction |
| Art tutorials |
| Geometric tutorials |
| Video tutorials |
| Maple Leaf |
| Tiger |
| Maple Leaf : Part 1 |
| Maple Leaf : Part 2 |
| Maple Leaf : Part 3 |
| Tiger : Part 1 |
| Tiger : Part 2 |
| Tiger : Part 3 |
| Tiger : Part 4 |
| Tiger : Part 5 |
| Tiger : Part 6 |
| Tiger : Part 7 |